The Stopper System- a Better Leader to Tippet Connection
In a full day of fishing, I usually end up changing my tippet out a lot. Depending on the day and how I’m fishing, I sometimes tie a new tippet section to the leader twenty or thirty times if I’m switching between a number of tactics. There are currently a few really popular methods of attaching tippet to the leader or sighter; tippet rings, tying directly to the leader, or tying to an intermediate tippet piece. All three methods are fine, but they each have some notable negative aspects.
The downsides of popular connections
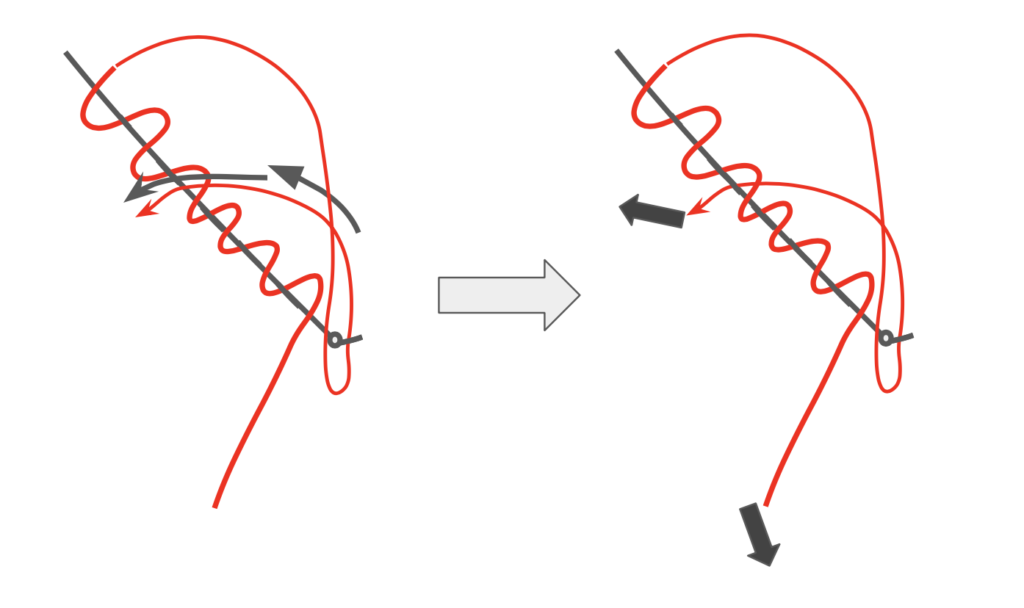
When I first started competing I, and pretty much everybody else, used tippet rings. They were the fastest, most convenient method and saved a lot of time during sessions. My favorite aspect of tippet rings is that you tie tippet directly to the ring without using any of the sighter or leader, which allows you to use the same leader for a longer period of time without replacing or fixing it. The downside of rings is that they are heavy enough to create a hinge in the leader. Especially with the modern thin leaders, this hinge will throw off casting accuracy and pull the flies back toward the rod. I saw enough of an effect to switch away from tippet rings in favor of something lighter.
After I quit using tippet rings, I switched to tying the tippet directly to the leader or sighter using a triple surgeon’s knot. This method had the big advantage of not hinging, however it took longer and required using part of the main leader to tie. With the amount I changed tippet, using this method meant that I usually lost around six inches of sighter every session of a competition. It also took me about twenty seconds longer to tie, which doesn’t sound like much but adds up fast over a day. It was better than a tippet ring, but still left a lot to be desired.
I eventually started adding an eighteen inch or so long section of 5-6x tippet off my sighter so I didn’t lose as much from retying. This was a much better method, and probably my favorite of the “conventional” ways to add tippet. However, it still took more time to tie and I didn’t like the extra point of failure it added into the system. I knew I wanted to go to a different method, but I wasn’t sure of what else to do.
The idea behind the stopper system
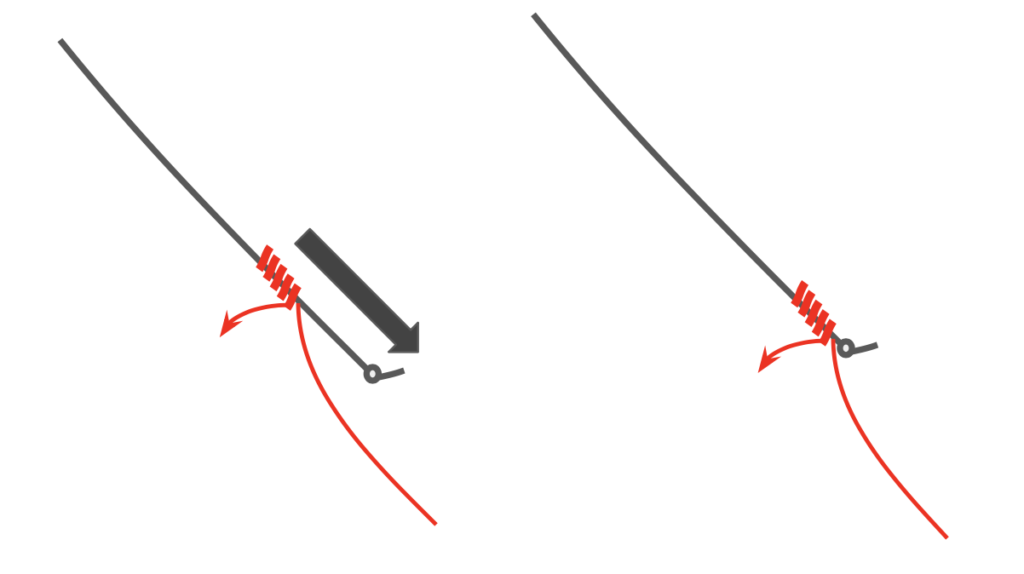
One day a few months later, I saw this article by Domenick Swentosky on Troutbitten, a great blog I’m sure everyone is familiar with. In it, he briefly talked about using an overhand stopper knot combined with a clinch or Davy knot to add on tippet. I immediately thought that seemed like a great idea and started messing around with it. The original method he talked about was good, however didn’t quite work for me as I needed it to be non-slidable (intentionally or accidentally) and more in line with the leader.
After trying a few different ways I finally settled on using an improved clinch knot wrapped around the leader, instead of tied off to it like Domenick depicts. This stopped it from being able to move and made the tippet hang almost straight off the leader like with a tippet ring or surgeon’s knot. I also switched to a three turn overhand knot for the stopper. With the larger stopper, I could break the tippet off cleanly without damaging the stopper knot. This meant I could tie off multiple times using just a clinch knot like with a tippet ring, but without adding any extra weight and creating a hinge.
I tested this connection out for a while before switching to it full time. As far as I know it has no proper name, so I just call it a stopper system. It is now the only leader to tippet connection I use, and I think it’s the best way there is. It’s strong, fast, and reliable with the good aspects of the other methods I discussed and none of the downsides. The ability to tie to a fixed point and not waste any sighter material without having a hinge point is a huge advantage. In the past four or so years using this connection, I can’t remember a single time I lost a fish solely because this knot failed on me. I’ve never read or seen anything about doing it quite like this, so I’ve done my best at making the step by step instructions below. I think their useable, but I will say there’s a reason I’m an engineer and not a graphic designer!
How to tie the stopper system
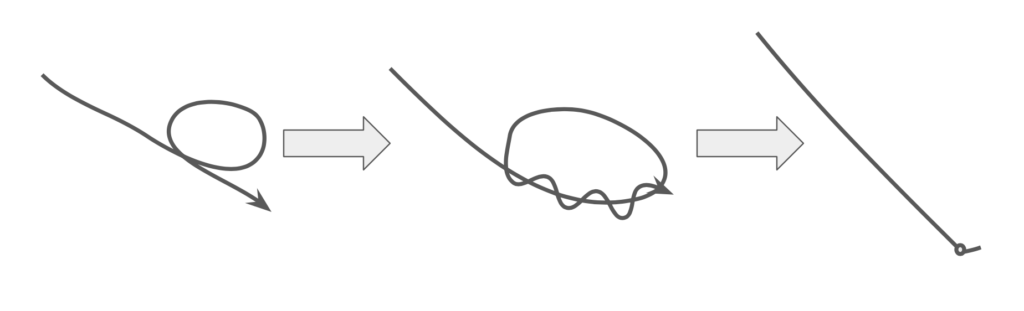
Step 1: Start by tying a triple overhand in the end of the leader or sighter. Make a loop and pass the tag end through three times. Wet the knot and tighten it down well leaving a small tag. Trim the tag to about a quarter inch, but leave at least a little to prevent slippage and increase visibility.
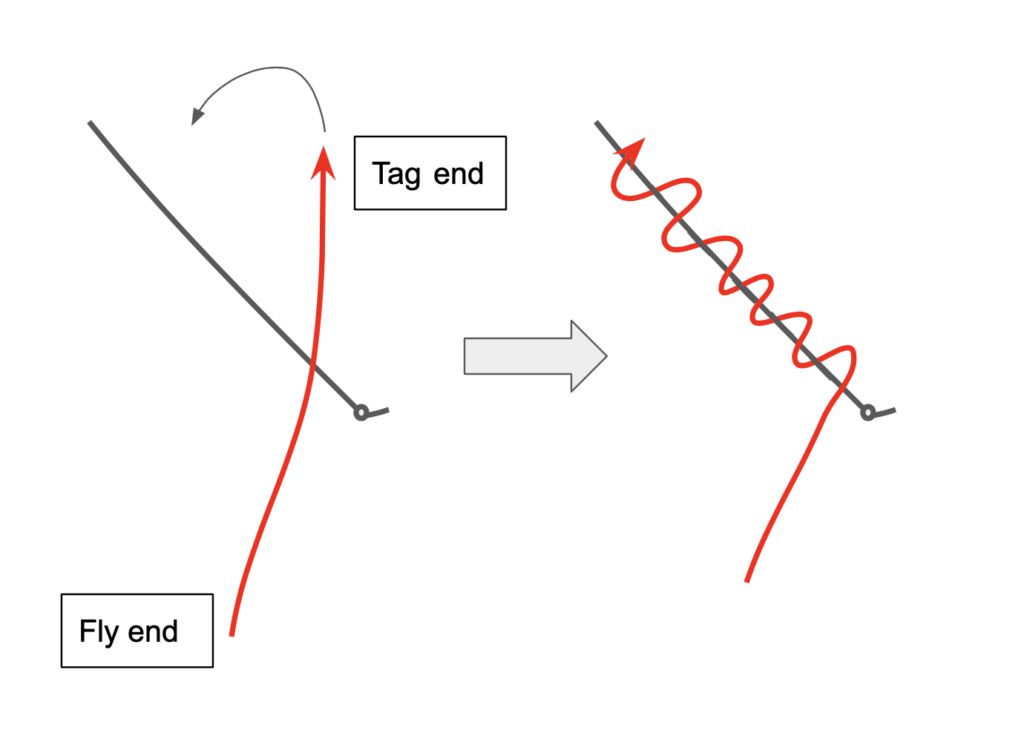
Step 2: Take the tippet and cross it over top of the leader with the tag end pointing towards the back of the leader. I find it easiest to hold the pieces right in the middle of the “X” they make with my thumb on the bottom (leader side) and pointer finger on top (tippet side), while holding the leader in my other hand. You should have four or so inches of tippet tag to start. Using your middle finger and other hand, wrap the tag end up and around the leader five times.
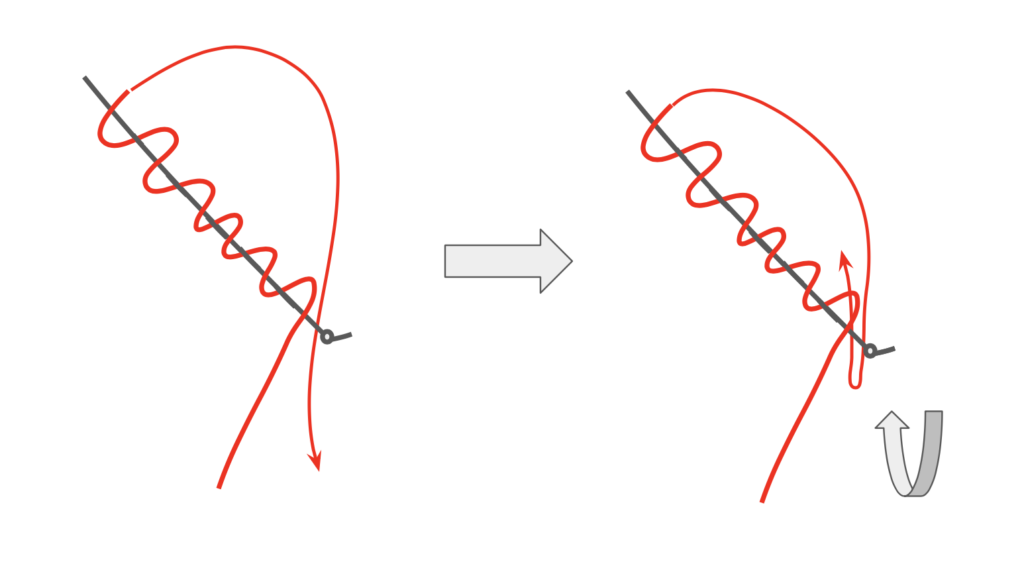
3: Take the tag end and bring it down through the “Y” made by the leader tag and tippet main end, and bring it around to the opposite side. I do this by holding the tippet main line to my palm with my pinky, ring, and middle fingers the leader tag with thumb and pointer to keep the “Y” open, and bring the tippet tag through with my non dominant hand. When the tag is through the “Y”, I hold it there with my middle finger.
4: You then bring the tag back through the large loop you just created using the middle finger and non dominate hand. This was the hardest step to draw out, but make sure you’re only taking the tag through the loop created by the tippet from the top of the wraps to the Y. Wet the knot and tighten it by pulling the tag and fly ends of the tippet in opposing directions at an angle from the leader. Don’t tighten it all the way, just get it most of the way tight.
5: Finally, take the mostly tight knot, slide it down to the stopper, and tighten it the rest of the way.
The final product:
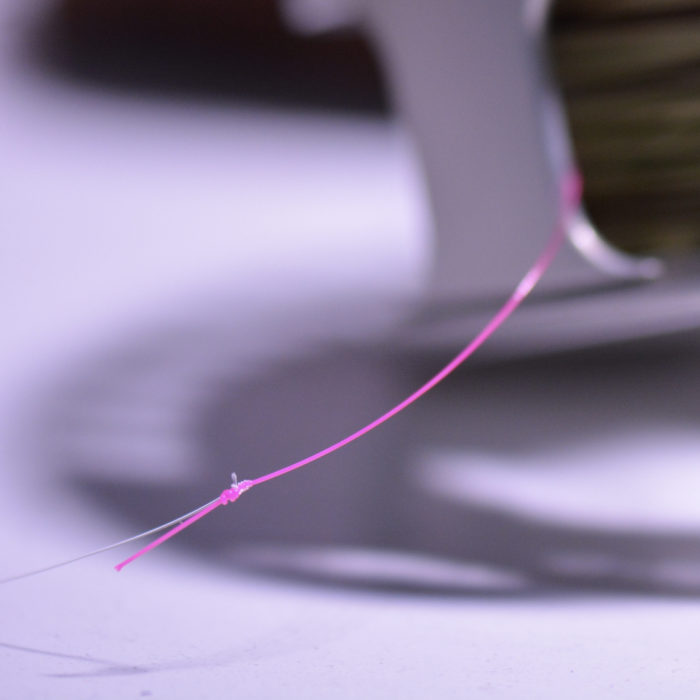
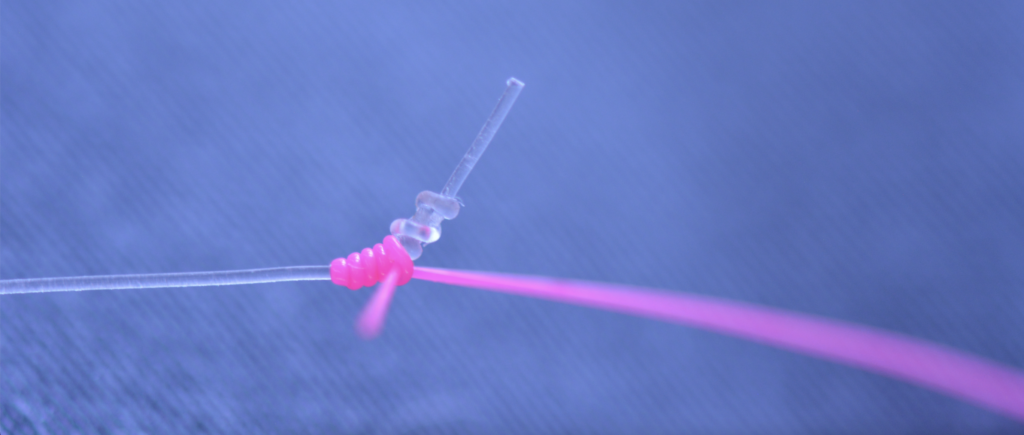
If everything went right, your knot should look something like the picture below. In the image the clear line is the leader, and I used sighter as the “tippet” to make it easier to see. The leader line here is a hard mono, so your actual stopper should end up being much smaller. Notice how the stopper sits off to the side, allowing for an almost completely straight connection between leader and tippet.
It is not an easy knot starting out because it takes some tricky finger work to do efficiently, but it gets a lot easier with a bit of practice. When you want to remove the tippet, just break it off with a sharp pull and the clinch knot should break itself without hurting the stopper. Sometimes the knotted part of the tippet will stay mostly intact on the leader, but that should come off with a few scrapes from a fingernail. In my experience, this connection works best when the leader or sighter is one size larger in diameter than the tippet. I have also found that it doesn’t work as well for tippets over 15 pounds as the larger diameters tend to slip on the leader.
Eventually the stopper knot will need to be replaced. How long it lasts depends on the leader/tippet size combo you’re using. With five pound sighter and 6x tippets I usually get around thirty tippet changes before I need to retie the stopper. You can tell if it needs replacing by looking for deformation or thinning of the leader right above the stopper; when it starts to look weird, just cut the stopper and tie a new one.
If you spend some time working with this system, I promise it will become your new favorite method for attaching tippet. Most people I have shown the stopper system have loved it and now use it as their main connection. It takes some practice, but I think eventually anyone can tie it faster than most other connection knots. Give it a try and let me know what you think!
Tight lines,
Mike Komara